In an era where web applications need to be both agile and dynamic to
meet user demands, the integration of React.js into your Liferay portal
can be a transformative solution. In this blog post, we'll delve into
the powerful synergy between React and Liferay DXP, showcasing how this
combination can empower developers to craft captivating web applications
while streamlining the coding process.
What is React Portlet?
A React portlet is a bridge between Liferay's Java-based architecture and the React.js library. It enables a developer to build interactive and responsive components within a Liferay portal using the declarative approach of React. This means you can create a user interface that updates dynamically in response to user interactions, all while maintaining the benefits of Liferay's content management and collaboration features.
Advantage of React Portlet in Liferay DXP:
- React's virtual DOM (Document Object Model) enables efficient updates to
the user interface. It only updates the parts of the UI that have
changed, reducing the need for full page reloads and improving
performance.
- React Portlet can seamlessly integrate with Liferay DXP's
APIs, ensuring that uploaded content is stored and managed
effectively within the platform.
- Another advantage of using React in Liferay for portlet development is
that developers don't need in-depth knowledge of Liferay. Front-end
developers can work independently on the react work, focusing on
creating interactive and engaging user interfaces without being tightly
coupled to the backend infrastructure. This separation of concerns
allows for more efficient development, as frontend developers can work
in parallel with backend teams, streamlining the development process.
Creating a React Portlet in Liferay: A Step-by-Step Guide
Creating a React portlet in Liferay can be achieved through various methods,
such as using the JS Generator and Blade Command/IDE.
Prerequisites:
Before diving into React portlet development, ensure that the following
prerequisites are met:
Node.js and npm: Node.js and npm should be installed on your
development machine to manage React dependencies effectively.
1.JS Generator
Here, we'll focus on using the JS Generator.
To create a React module in Liferay using the JS Generator, follow these
steps:
Install Yeoman for the Generator:Use the following command to install
Yeoman.
npm install -g yeoman
Install the Liferay Generator Globally: Open your terminal and run the
following command to install the Liferay Generator globally using npm:
npm install -g yo generator-liferay-js
Navigate to Your Project Directory:
Open your terminal and navigate to the directory where you intend to create
your React portlet.
Run the Generator: Use the following command to initiate the
generator,
yo liferay:js
These steps will guide you through creating a React module in Liferay using
the JS Generator.
After the code has been generated, you'll have this structure:
my-module
├── README.md
├── assets
│   └── css
│       └── styles.css
├── config.json
├── features
│   ├── configuration.json
│   └── localization
│         └── Language.properties
├── package.json
└── src
    ├── AppComponent.js
    └── index.js
Now Your Module has been created , then you can build and deploy.
2. Blade Command/IDE
The second approach for creating a React module in Liferay involves using the Blade CLI command. If you prefer to create an npm React portlet using Blade CLI, follow these steps:
Open Your Terminal: Launch your terminal or command prompt.
Navigate to the Desired Directory: Use the “cd” command to navigate to the directory where you want to create your React portlet.
Run the Blade CLI Command: Execute the following Blade CLI command to create a module for your npm React portlet:
blade create -t npm-react-portlet [-p packageName] [-c className] projectName
Here's a concise guide for creating a React module in Liferay using IDE(Intellij IDEA)
Open Intellij IDEA:Launch Intellij IDEA on your computer.
Create a New Project:File > New > Project > Liferay Workspace > Provide a name and location > Finish.
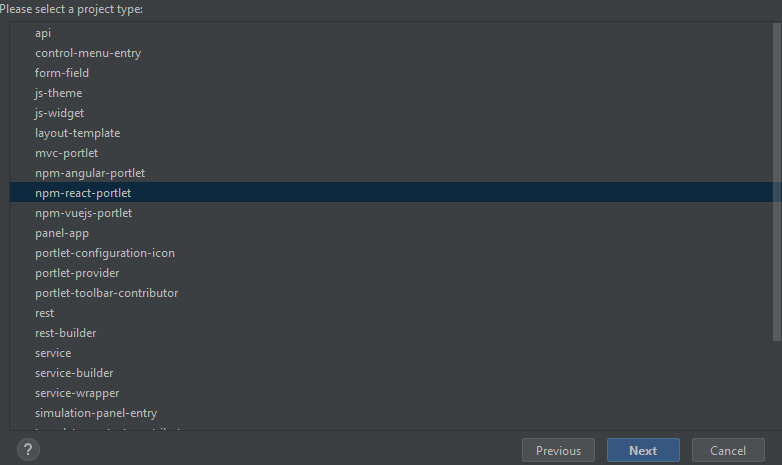
Create a New Module:Click on "modules" in the Liferay Workspace > New > Liferay Module.
Select the Module Type: Choose "npm-react-portlet" from the dialog box.

Develop Your React Portlet: Start building your React components and functionality in the project.
Conclusion:
A React Portlet in Liferay provides a powerful toolkit for elevating your web development. It combines the best of React's dynamic UI capabilities with Liferay's portal environment, resulting in an enhanced user experience, streamlined development process, and responsiveness. With a React Portlet, you can meet the demands of modern web applications and engage users effectively while enjoying the benefits of a strong developer ecosystem.
How can we help?
At Stockfish Technology, we specialize in empowering businesses to harness the full potential of React Portlet in Liferay DXP. We bring a wealth of experience in leveraging React Portlet in Liferay DXP to help businesses grow faster and thrive in the digital realm.


